RCBot2
Waypointing Guide
Table of Contents
Commands
Rcbot waypoint
Rcbot waypoint on/off
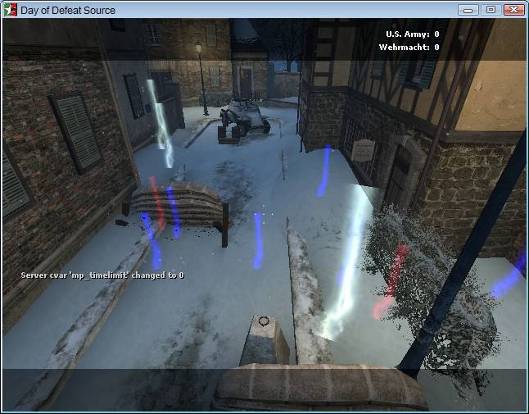
Figure 1: Waypoints On
Rcbot pathwaypoint
Rcbot pathwaypoint on/off
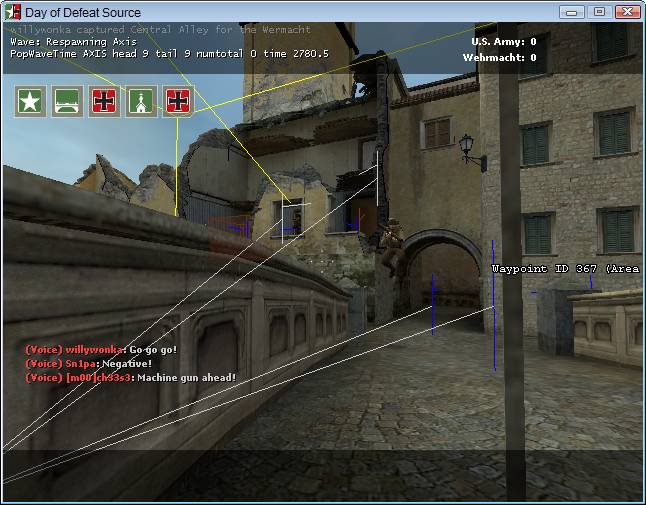
Figure 2: path waypoints on
rcbot waypoint add
rcbot waypoint add [type 1] [type 2] [type 3] [type 4]
e.g. “rcbot waypoint add sniper noallies” creates a waypoint with sniper and noallies type together in one command
Rcbot waypoint delete
Deletes the nearest waypoint
Rcbot waypoint show
Rcbot waypoint show <waypoint id>
Shows a big lightning effect that shows you where the waypoint <id> is.
Rcbot waypoint drawtype
Rcbot waypoint drawtype <type>
1 = normal
2 = use debug engine (windows/client only)
3 = use debug engine (windows/client only) + show waypoint information

Figure 3: drawtype 2
Rcbot waypoint updateyaw
Rcbot waypoint updateyaw : updates the direction the waypoint faces, useful for improving poor sniper waypoints, sentry, machinegun etc..
Rcbot waypoint setarea
Rcbot waypoint setarea <area ID>. In DOD:S areas are used for the capture point. If you want to add a defend / sniper or machinegun waypoint, they should have the same area as the capture waypoint at the flag/bomb they are defending/attacking. In TF2 areas are used for the capture point/flags/sentry points/sniper points, in certain maps when certain areas are closed off or open these are useful (e.g. dustbowl).
Areas are useful in maps such as CP maps when events trigger new parts of the map to open or close or new CP points to capture. E.g. in pl_goldrush there are two capture points in the first part of the map. The first capture point should be given a different area from the second so that bots know which waypoints to use to defend them. Similarly teleporter entrances are needed for both teams in the same place at different areas (picture)
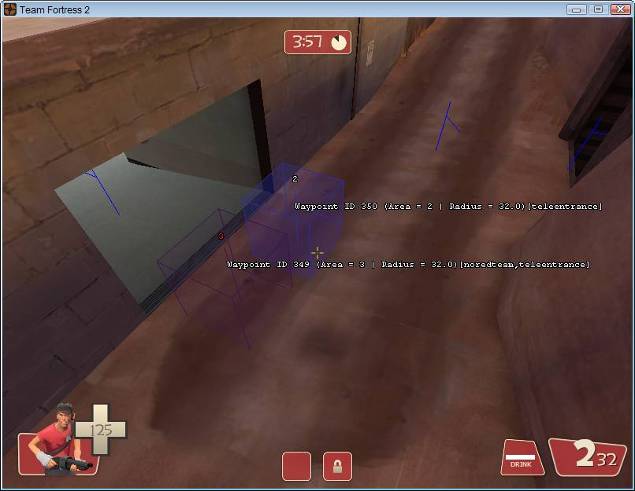
Figure 4: different areas
When an area is unavailable the waypoint will show the area number in red above it. If it is available the area number will be in white. (see picture above).
rcbot_wpt_autoradius
not fully implemented yet. Adds a radius automatically when added.
rcbot_wpt_autotype
based on the MOD being played if this is 1, when you place a new waypoint, they will automatically be given flags such as resupply, capture point, flag, health, etc…
rcbot_wpt_pathdist
rcbot_wpt_pathdist <distance> (default = 400) The distance at which new pathwaypoints are added automatically. If there are too many
rcbot_wpt_width
rcbot_wpt_width <width distance> (default = 48). This should be about the same width of the player. This is used to stop waypoint paths from automatically being added through small holes or just around corners. Increase the width to allow more room before a path is added automatically.
Note: You may have to check whether a path has been added correctly with this at default.
rcbot waypoint givetype
rcbot waypoint givetype <type> [type 2] [type 3]
toggles waypoint types. If waypoint already has the type in the command, the type will be removed from the waypoint.
rcbot pathwaypoint create1
remembers the waypoint you are standing at to create a path from.
rcbot pathwaypoint create2
creates a path between the waypoint when you use the create1 command and the waypoint you are now standing
rcbot pathwaypoint remove1
remembers the waypoint you are standing at to delete a path from.
rcbot pathwaypoint remove2
deletes a path between the waypoint when you use the remove1 command and the waypoint you are now standing
rcbot pathwaypoint deletefrom
deletes all paths going from the waypoint you are standing at
rcbot pathwaypoint deleteto
deletes all paths going to the waypoint you are standing at
Notable
waypoint types
Common
waypoint types
Jump
A bot will jump here. To make a good jump waypoint make sure the jump waypoint has a “run up” from another waypoint (in the picture) in the direction the bot should be jumping from.
Note: Make sure the jump waypoint has a path only to waypoints that should be touched by jumping. I.e. don’t make the jump waypoint have a path back to the “run up” waypoint.
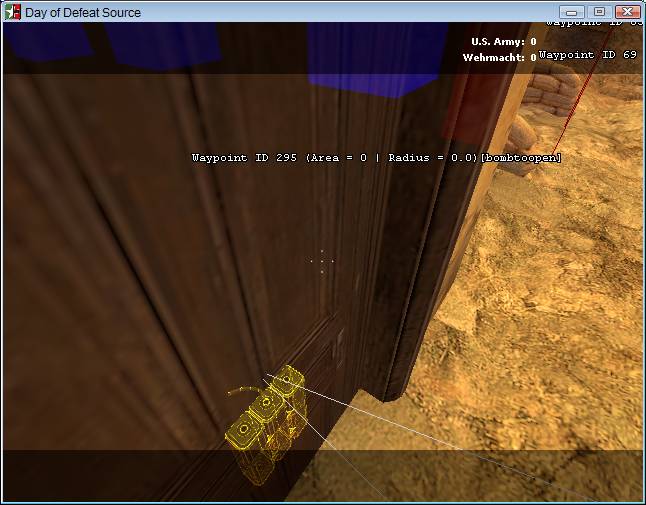
Figure 5: jump waypoint
Ladder
These waypoints help bots climb ladders as they denote when bots should go UP a ladder. If they need to go DOWN a ladder you do not need to add a ladder waypoint.
1) Stand at the bottom of the ladder when you just start to ‘stick’ to the ladder, add a ladder waypoint in the centre of the ladder at the bottom
2) Use “rcbot pathwaypoint create1” to get ready to add the path to the next ladder waypoint
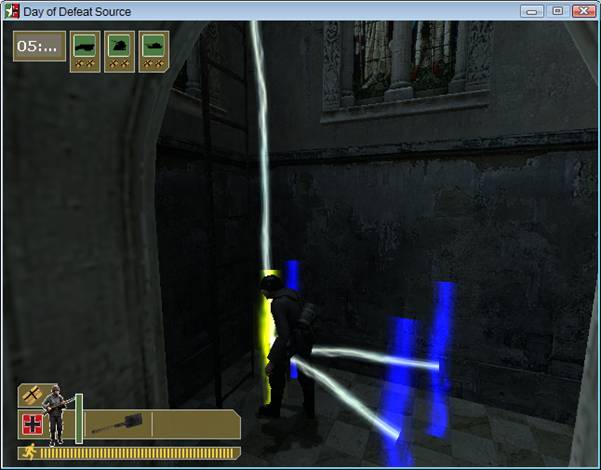
Figure 6: Bottom ladder waypoint
3) Climb to almost the top of the ladder, make sure you are still stuck to the ladder and add another ladder waypoint.
4) Use “rcbot pathwaypoint create2” to create the path from the bottom to the top
5) Add a normal waypoint at a safe location to exit the ladder at the top and make sure there are no other paths from the top ladder waypoint (see figure 7)

Figure 7: top ladder waypoint
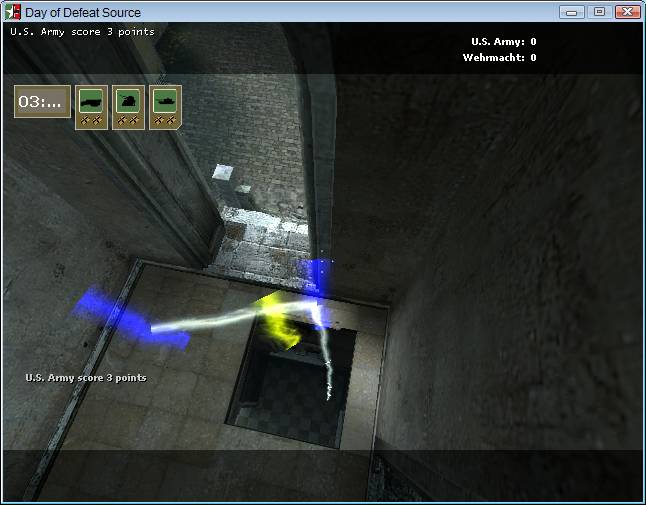
Figure 8: ladder going down
To go down a ladder just add a normal waypoint at the top of the ladder and another normal waypoint at the bottom of the ladder. Make sure they have a path going DOWN. (Not going up)
Team
Fortress 2
Health
Place at health pickups that are useful to bots, not all health pickups are useful, e.g. areas that you can only get to by double jumping .

Figure 9: health waypoint
Route
Tells bots to use one of these route waypoints before going to the goal. They should be the same area as the goal. It allows bots to use different paths such as tunnels etc.
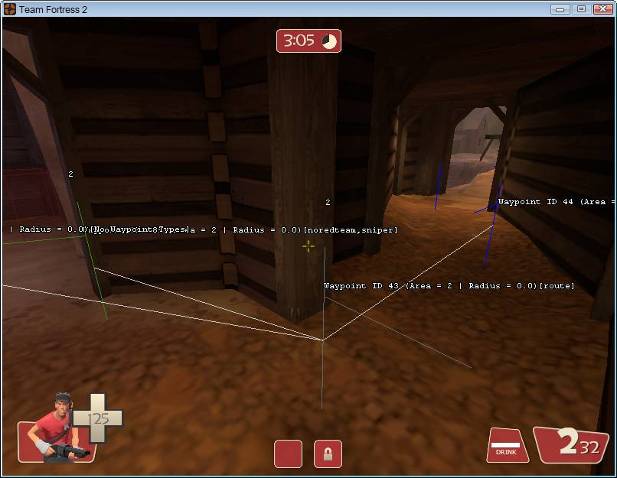
Figure 10: route waypoint
Flag

Figure 11: flag waypoint
sentry

Figure 12: sentry waypoint
ammo

Figure 13: ammo waypoint
Teleentrance
Teleporter entrance, place anywhere near the spawn of the team where you can build. It should be given a radius and a team.
Note: Teleporter entrances should be given an area in cp maps or pl maps etc, as spawns can change and areas become unavailable

Figure 14: teleporter entrance
Teleexit
Teleporter exit, place anywhere in a good strategic point for the team.
Note: Teleporter exits should be given an area in cp maps or pl maps etc, as spawns can change and areas become unavailable. Preferably given the same area as the capture or flag waypoint they will attack from the exit.

Figure 15: teleporter exit
Capture
Capture point. Should be given a radius about the same size as the capture point. In some maps you don’t need to give them a team (e.g. dustbowl as it’s an attack defend map)
Note: Capture points should be given an area in cp or pl maps etc. as there may be several points. The areas must coincide with the areas in the script

Figure 16: capture point, notice area at the top of the waypoint in white meaning available
Rcbot waypoint areaonly
Bots can only go here if the area in the script is available. Useful when areas close down after a capture point. .e.g in dustbowl, see picture:

Figure 17: area only waypoint: notice the area number at the top of the waypoint in red, meaning not available (cap point 2)
When the area is unavailable the area number will appear red. This means the waypoint in unreachable
Day
of Defeat Source
bombs
Place this where you can find a bomb dispenser, when bots touch this, they know they have picked up a bomb. Note: By giving this waypoint an area other than 0 (rcbot waypoint setarea <area>), this allows bots to know that the bombs waypoint is used by both teams and needs to be defended. Add more defend waypoints, sniper and machinegun waypoints with the same area id as the bombs waypoint to let bots defend it.

Figure 18: bombs waypoint with an area
Noaxis
Self explanatory: no axis team bots can use this waypoint
Noallies
Self explanatory: no ally team bots can use this waypoint
Defend
Colour: red
Bots go here to defend. Make sure you are facing in a good direction when you place the waypoint. You will see the direction in rcbot waypoint drawtype 1 or 2. To update the direction, goto the waypoint, face the desired direction and use “rcbot waypoint updateyaw”
Note: Defend waypoints are more useful when they have an area set (rcbot waypoint setarea <area>). They should be the same area as the capture point or bomb point it is defending.
Sniper
Colour: green
Place sniper waypoints at good sniping positions. Make sure you are facing in a good direction when you place the waypoint. You will see the direction in rcbot waypoint drawtype 1 or 2. To update the direction, go to the waypoint, face the desired direction and use “rcbot waypoint updateyaw”

Figure 19: sniper position waypoints, notice the angle of the waypoint facing outside the window
Note: Sniper waypoints are more useful when they have an area set (rcbot waypoint setarea <area>). They should be the same area as the capture point or bomb point it is defending/attacking.
Unreachable
Colour : white
Use unreachable waypoints to help bots know where enemy fire came from. Bots cannot go to these waypoints but they are used to let bots know where to take cover and where danger might be.
Notice the unreachable waypoints in the picture. An enemy may be in the sniper waypoint but most likely the sniper waypoint is invisible to many waypoints where the sniper can shoot. So the unreachable waypoint helps with visibility as it is visible to both the attacker and the victim.
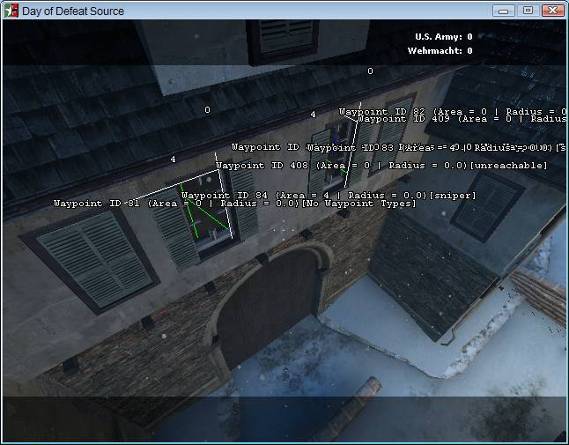
Figure 20: unreachable waypoint, notice the position so that it is visible from the sniper position and shootable positions
Note: you can also add a path to an unreachable waypoint. Bots won’t go to them but they will use them for information, such as danger points.
Figure 20.1: other waypoints connected to an unreachable waypoint for danger purposes
Capture
Colour : yellow
Capture waypoints are not required however they are useful for waypointers to know and remember which area that the bomb points or flags are at. As long as rcbot_autotype is 1, the type and area will be automatically added. Use the same area in the future to help with defend/sniper and machine gun waypoints.
Note: A round must have been started for the bot program to know which flags/bombs are on the map so that the auto flag/bomb ID will work. Join a team or add a bot to start a round.
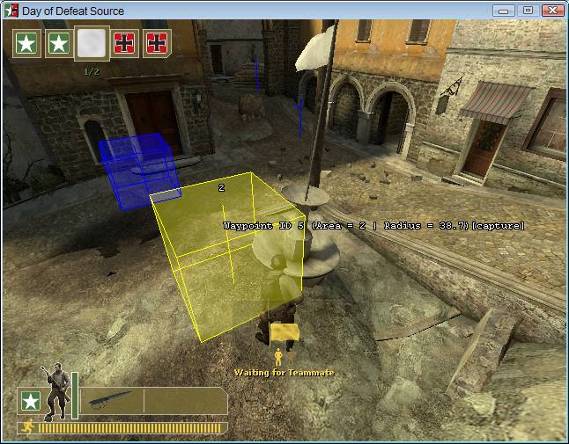
Figure 21: capture point in DOD:s, the area is added automatically for your use
Openslater
Colour : pink
An Openslater waypoint will normally join together with another openslater waypoint. These waypoints are for knowing when areas of the map open up or close. An example of this is in dod_jagd when the axis team fully bomb the tank, the path will open up. Using this type of waypoint eliminates the requirement of a complicated script.
Note: to increase performance, use pathwaypoint commands to remove unnecessary paths to these waypoints. Only have these two waypoints connect to each other. Only have one normal waypoint connecting to the opens later waypoint to increase performance.
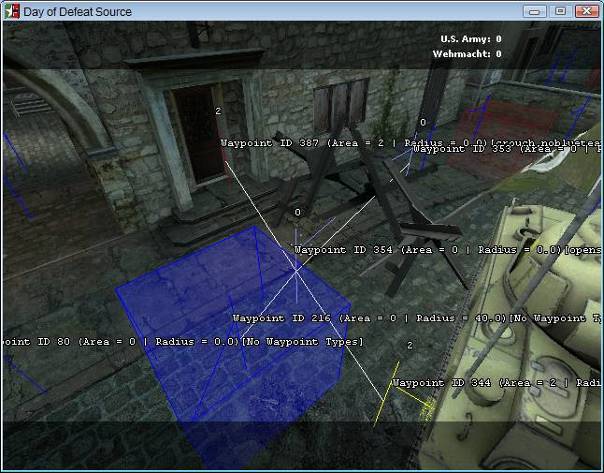
Figure 22: opens later waypoint, should only have one waypoint with a path TO the waypoint and one path to another openslater waypoint on the other side
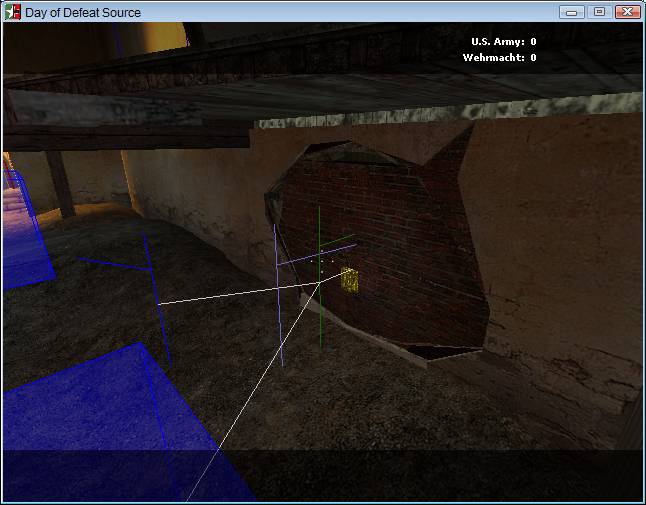
Bombtooopen
Bomb to open waypoints require the bot to use a bomb to get through the path
Tip: Make sure bomb to open waypoints have paths going back so bots can move back and take cover to wait for the bomb to explode.
You can waypoint them in these two cases:
Case 1: There are
bomb points on each side of the wall.
Put a bombtoopen waypoint in the middle of the wall and make sure it has a path to waypoints on either side.
Make sure no normal waypoints have paths through the wall
The image below shows the waypoints on the other side
Case 2: The wall has
a bomb point on only one side of the wall
To deal with this just put the bombtoopen waypoint on the side with the bomb and connect it to another waypoint through the wall.
Make sure the waypoint on the other side does not have a path back to the bomb to open waypoint.
(below)
Add an opens later (openslater) waypoint on the same side as the bomb
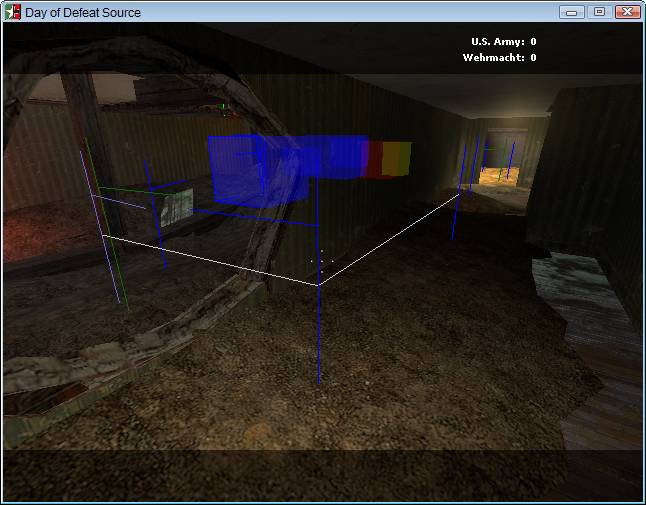
Connect a waypoint on the inside (where there is no bomb point) to the opens later waypoint
When the bomb explodes the bots will know it can go through without needing a bomb on either side.